Tuesday, 30 September 2014

Advent Mini Stocking Bunting-Tutorial

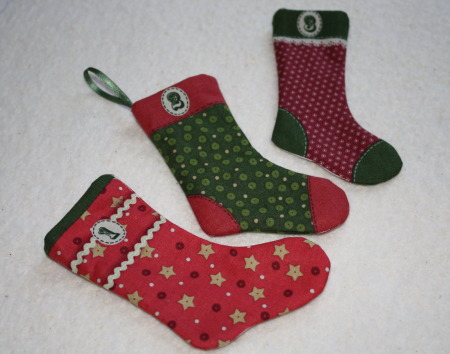
Just how cute are these easy to make Advent Mini Stockings? This is how we made them. I know Makower say to line them but that is very fiddly and we don't think they need it.


Requirements:

1 x Makower Advent Stocking panel
60cm (24") backing fabric (we used plain red)
3m (3.3yds) ribbon cut into 24 equal pieces (approximately 5"), for hanging
Matching cotton thread
Mini pegs
2m (2.2yds)  ribbon to hang the stockings on

Press the panel and the backing fabric.
Lay backing fabric right side up on table place the stocking panel on top with right side down The fabrics will be right sides together


Pin, we just used one pin in each stocking to keep everything together


Carefully cut around each stocking on the dotted line. We used pinking shears for the top of the stocking and regular fabric scissors for the sides.


Fold one of the ribbon piece in half and slip between the stocking and the lining, close to the top edge. Pin in place.
Stitch around the leg and foot of the stocking only on the line. DO NOT stitch the top edge or you will have to unpick!


Carefully clip all the curves or cut around the stocking with pinking shears  


Fold top of stocking to wrong side along the line, fold the backing to match.


Stitch in place, taking care to keep the hanging ribbon out of the way.


Turn right side out and press. Make 24. 


Slip stockings onto ribbon in a random order, peg in place and hang on the wall. Fill with trinkets of sweeties, and enjoy.


Panels, fabrics, ribbons, pegs, thread, and even sewing machines to sew them are all available at the Quilted Sheep now.

Friday, 29 August 2014

SUMMER SALE

We are having a SUMMER SALE 

Up to 50% off selected fabrics, hand knitting yarns and kits.

We also have 10% off all our Warm Company Waddings until the 30th September too.

Tuesday, 31 December 2013

January Sale.........


It's January sale time.

10% off all fabrics, yarns and kits

 Starting 10:00 am 

 Thursday 2nd January 2014.

For one week only


Friday, 6 December 2013

Winter Penguin Bunting - Tutorial (easy)


Bunting made with the adorable Winter Penguins fabric from Benartex


Requirements: Winter Penguin fabric, 1/2" cotton tape, thread, pins and pinking shears. You will also need a sewing machine. I used the wonderful Brother Innovis 550, but any machine that will do a straight stitch will do! 


Cut the bunting squares using pinking shears, then pair them up. You could use a plain fabric on the back if your bunting is going against a wall, I did ours double sided as it is going in the window. Pin the pairs with wrong sides together on three sides leaving top edge open


Open top edge and, leaving enough tape to the left of the square for hanging purposes, insert the tape between the squares.


Pin top edge through all three layers


Leaving a suitable gap (I left approximately one inch) pin the next pair to the tape. Repeat until all the squares are pinned in place.


Beginning at the top edge of the first square, stitch through all three layers, removing the pins as you go. Stop at the corner with the needle in the fabric. 


Turn through 90 degrees and sew the next side, continue round the square until you get back to the first corner. Stitch over the first row of stitching, then continue along the tape to the next square. 


Stitch around all the squares. Remove from the sewing machine, hang in place and admire.  


I know its not pictured in the window, I couldn't get a decent photo in the window so I temporarily pinned it to the door frame. It's back in the window now! 

Friday, 13 September 2013

Classes

Classes are starting again next Saturday 21st September, if you are interested in learning patchwork and quilting and have not already received details please call in or email us at thequiltedsheep@gmail.com


I'm starting with these fabulous fabrics...

Friday, 1 February 2013

Brand New Bargains from Brother

Our sale may be over but Brother have some great new deals starting today: February 1st 2013:

The awesome  NX2000 sewing machine has been reduced by a whooping £300 to a very tempting £1299


The NV955 sewing and embroidery machine - comes with FREE PE Design Plus to create your own original embroidery designs - worth £349


NV20LE Sewing Machine comes with a FREE Wide Table and Blue Bag worth £84


For more detailed information click on the links which will take you to the appropriate page of Brother's website.


Thursday, 31 January 2013

Workshop: Beginners Machine Appliqué

Machine Appliqué a workshop for beginners:

On Saturday 9th February Julie will be running another beginners workshop.

In keeping with the month we shall be making a Valentine cushion cover. 

This will be a  fun and informative day spent discovering different ways to apply motifs to fabric using fusible web and machine stitch.

As always Julie will provide lots of tips and tricks along the way including her 'Easy-Peasy' way to Sew in a Zip. After learning this technique you will never need to make another envelope style cushion back!

Contact The Quilted Sheep for further details and to book your place.

Thursday, 17 January 2013

Shhh....we're having another SALE


Yippee a sale 

25% off selected 

fabrics

yarns 

& cross stitch kits 

ends on 31st January. 

Thursday, 6 December 2012

Hanging Sleeve Tutorial

How to make and attach a hanging sleeve to a quilt or wall hanging:

I shall be making the sleeve for a small wall hanging as a worked example, so all the numbers will relate to that, yours will of course be different.
Measure the top of your quilt:  13.75"   IMG_1246a
Take 1.5" off this measurement: 13.75 - 1.5 = 12.25
Cut your sleeve fabric 9" by this measurement: 9" x 12.25"
Zig-zag or overlock the two 9” edges, then press 0.5" to wrong side. IMG_1251a
Stitch close to raw edges. IMG_1254a
With ws and raw edges together gently press the fold. IMG_1258a
Open up, bring the raw edges to the fold you have just created, press in the two new folds, pressing out the previous fold. IMG_1263a IMG_1265a
Open up, with ws and raw edges together pin and stitch approximately 3/8” from edge.
Carefully press the seam open do not press out the folds.IMG_1266a
With the pressed seam facing down on to the back of the quilt centre one fold of the sleeve below the binding at the top of the quilt. Pin. IMG_1270a
Smooth the sleeve and pin the second fold to the quilt, you should now have a D shaped sleeve pinned to your quilt.IMG_1275a  
Slip stitch sleeve to quilt through backing only, take care that your stitches do not show on the front of  the quilt. Stitch the sleeve sides too between the folds, this will prevent the hanging device going between the quilt and sleeve and possibly damaging the quilt.
That's all there is to it, hang your quilt and enjoy.
Happy Stitching
Julie & Charlotte
All text and images are copyright of Julie Lawrenson-Wood and The Quilted Sheep©, please do not copy without first asking permission. Thank you.

Tuesday, 27 November 2012

Sale Ends Friday

Just a quick reminder there's only a few days left to bag a bargain... our 25% off selected fabrics, yarns and cross stitch kits ends this Friday 30th November.

Sunday, 25 November 2012

Creative Winter Offers from Brother

This week we’ve got the perfect Christmas present at at a really good price... Yes its the great winter offers from Brother sewing machines.

All the models highlighted below are in stock along with several others.

UJ417 was £109 now £99

uj417 

A free Blue Carry bag worth £19.99 is also included in this amazing price

  • 17 Stitches
  • 4 Step auto button hole
  • Bright led sewing light
  • Free arm conversion
  • Instructional DVD


 Innov-is 10A was £249 now £229

NV10A_cross

  • Computerised
  • 16 stitches
  • Start/stop button
  • slide speed control
  • Stitch length & width control
  • 1 Step auto button hole
  • Auto needle threader


Innov-is 50 was £499 now £449

NV50

  • Computersied
  • 135 Stitches inc lettering
  • 10 styles one step auto button hole
  • Advanced auto needle threader
  • stitch length & width control
  • Combine & memorise stitches
  • Slide speed control
  • Start stop button
  • Mirror imaging
  • Hard case

And as an authorised Brother Dealer we offer all the Brother sewing machines at both the promotion and regular prices, more details of which can be found here at Brother UK

Don’t leave it too late come in and have a play, these bargains are only available until 31st Dec or whilst stocks last.

Happy stitching Charlotte & Julie

Saturday, 17 November 2012

Mini Christmas Stockings Tutorial

My apologies for posting this without a finished picture but I haven't got my camera with me, sorry


 Requirements:
1 x Northcott's 'Stocking Stuffer' panel
60 cm (24") x lining fabric (I used a solid maroon colour)
3.2 m (3.25 yds) x 3 mm (1/8")  ribbon
1 x reel thread - Gutermann natural cotton shade 2433
Bunting tape
25 x Mini pegs
Sweets or chocolates to fill the stockings

To Make up:

1 Press the Panel and the lining fabric.

2 With the lining fabric rs(right side) down, place the stocking panel on top ws(wrong side) down. Pin.

3 Cut out all the stockings on the marked dotted line cutting through both the panel and the lining fabric, keep matching backs and fronts together.

4 Cut the ribbon into 25 x 4.5 inch lengths

5 With rs together pin a stocking front to its lining, also pin a stocking back to its lining.

Friday, 9 November 2012

Mini Christmas Stockings

I'm busy making the stocking Stuffer panel by Northcott. The panel has 25 mini Christmas stockings, both fronts and backs. You can use them to make advent calendar bunting or decorations, or you could use them as appliques.  The stockings measure approximately 3.5 inches from the top of the stocking to the heel and they are just so cute.


As I create I'm busy taking photos for a tutorial which will be coming soon....
In the meantime I'd better get back to the sewing machine or advent will be upon us and they won't all be finished!

Julie

Saturday, 27 October 2012

Tutorial: How to make a soft book from a panel


So many people come in the shop and admire our soft books, and want to know how we make them. Since Julie has added a couple of extra touches to the included instructions, we've written this tutorial to show you how we do it:

For the tutorial we shall be using 'A Bazooples Day' by Vivki Schreiner.


Requirements:

Friday, 19 October 2012

SALE SALE SALE

I can't believe I for got to mention... 
we are having our first SALE

25% off selected fabrics, yarns and kits.

Come in and grab a bargain whilst it lasts...

Thursday, 18 October 2012

Awakening the Sleeping Blog...

As you can see we've done nothing with the blog since we opened the shop, other than announced we'd opened the shop!
It was always our intention to use it to let everyone know what we were up to, post tutorials and generally keep you all informed... but along with all the excitement of opening the shop, not to mention the sheer hard work of running it, we have yet to get around to using it. Not that we complain (too often) about the hard work involved, we absolutely love running the shop, not to mention how exciting it is to meet all you wonderful quilters, knitters and crafters and seeing what you've made.
So lets make a start with the blog....

Here's a taste of our first tutorial which will be published soon


Its a tutorial for beginners, or those who need a little guidance, on how to make a soft book using a panel.
We're using this cute book A Bazooples Day... by Vicki Schreiner which arrived in the shop today.

Thursday, 28 April 2011

We're Open


After months of planning, lots organising, exciting buying trips, and some very very late nights The Quilted Sheep is finally open.
The Quilted Sheep is a specialist quilt fabric and knitting wool shop and is the realisation of the dreams of the mother and daughter team of Julie Lawrenson-Wood and Charlotte Byram.
Julie is a quilter with many years experience and she looks after the patchwork, quilting and applique side of the business, whilst Charlotte, a keen knitter, takes care of the wool.

If you are in the Lake District or planning to visit do come and see us.
You will find us here at The Old Bakehouse on Main Street in the friendly market town of Milnthorpe in Cumbria.