I'm starting with these fabulous fabrics...
Friday, 13 September 2013
Classes
Classes are starting again next Saturday 21st September, if you are interested in learning patchwork and quilting and have not already received details please call in or email us at thequiltedsheep@gmail.com
Friday, 1 February 2013
Brand New Bargains from Brother
Our sale may be over but Brother have some great new deals starting today: February 1st 2013:
The awesome NX2000 sewing machine has been reduced by a whooping £300 to a very tempting £1299
The NV955 sewing and embroidery machine - comes with FREE PE Design Plus to create your own original embroidery designs - worth £349
NV20LE Sewing Machine comes with a FREE Wide Table and Blue Bag worth £84
For more detailed information click on the links which will take you to the appropriate page of Brother's website.
The awesome NX2000 sewing machine has been reduced by a whooping £300 to a very tempting £1299
The NV955 sewing and embroidery machine - comes with FREE PE Design Plus to create your own original embroidery designs - worth £349
NV20LE Sewing Machine comes with a FREE Wide Table and Blue Bag worth £84
For more detailed information click on the links which will take you to the appropriate page of Brother's website.
Thursday, 31 January 2013
Workshop: Beginners Machine Appliqué
Machine Appliqué a workshop for beginners:
On Saturday 9th February Julie will be running another beginners workshop.
In keeping with the month we shall be making a Valentine cushion cover.
This will be a fun and informative day spent discovering different ways to apply motifs to fabric using fusible web and machine stitch.
As always Julie will provide lots of tips and tricks along the way including her 'Easy-Peasy' way to Sew in a Zip. After learning this technique you will never need to make another envelope style cushion back!
Contact The Quilted Sheep for further details and to book your place.
Thursday, 17 January 2013
Shhh....we're having another SALE
Yippee a sale
25% off selected
fabrics
yarns
& cross stitch kits
ends on 31st January.
Thursday, 6 December 2012
Hanging Sleeve Tutorial
How to make and attach a hanging sleeve to a quilt or wall hanging:
I shall be making the sleeve for a small wall hanging as a worked example, so all the numbers will relate to that, yours will of course be different.Measure the top of your quilt: 13.75"
Take 1.5" off this measurement: 13.75 - 1.5 = 12.25
Cut your sleeve fabric 9" by this measurement: 9" x 12.25"
Zig-zag or overlock the two 9” edges, then press 0.5" to wrong side.
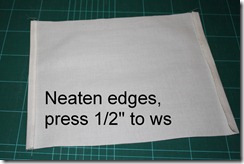
Stitch close to raw edges.
With ws and raw edges together gently press the fold.
Open up, bring the raw edges to the fold you have just created, press in the two new folds, pressing out the previous fold.
Open up, with ws and raw edges together pin and stitch approximately 3/8” from edge.
Carefully press the seam open do not press out the folds.
With the pressed seam facing down on to the back of the quilt centre one fold of the sleeve below the binding at the top of the quilt. Pin.
Smooth the sleeve and pin the second fold to the quilt, you should now have a D shaped sleeve pinned to your quilt.
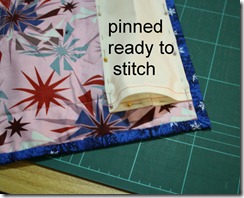
Slip stitch sleeve to quilt through backing only, take care that your stitches do not show on the front of the quilt. Stitch the sleeve sides too between the folds, this will prevent the hanging device going between the quilt and sleeve and possibly damaging the quilt.
That's all there is to it, hang your quilt and enjoy.
Happy Stitching
Julie & Charlotte
All text and images are copyright of Julie Lawrenson-Wood and The Quilted Sheep©, please do not copy without first asking permission. Thank you.
Subscribe to:
Posts (Atom)


